

Most people see a shemagh and assume it’s complicated. It’s a big square of fabric and nobody hands you an instruction manual. But here’s the thing, every single style comes down to the same few folds done in a specific order. Once you understand the logic, it clicks fast.
I’d argue the shemagh is one of the most practical things you can carry. Sun protection, wind block, dust mask, neck warmer. Let’s get into each style properly.
1. Classic Desert Wrap Shemagh:

This is the foundational style. Military, Bedouin travelers, outdoor workers, everyone in harsh environments uses some version of this. Learn this one first before anything else.
Step 1. Lay the shemagh flat on a table or hold it open in front of you. It’s a large square, roughly 42×42 inches for most standard shemaghs. Find the center of one edge, that’s your starting point.
Step 2. Fold the shemagh diagonally corner to corner so it becomes a large triangle. You want a clean fold with both sides matching up evenly. The long straight edge is now the base of your triangle.
Step 3. Hold the triangle up and place it over your head with the long folded edge running straight across your forehead, sitting about one inch above your eyebrows. The single pointed end of the triangle should be hanging down your back.
Step 4. Take the two loose ends hanging on either side of your face, one in each hand. Pull the right end across your chin to the left side of your face. Then pull the left end across on top of it, crossing both ends under your chin like an X.
Step 5. Bring both ends up and around to the back of your head. Tie them together with a simple knot at the back, or if the fabric is long enough, tuck them under the layers already wrapped around your head. Tuck is cleaner. Knot is more secure.
Step 6. Adjust the fabric at the front. Pull it snug around your cheeks and jaw. You want coverage but not pressure. Check that the top edge is still sitting low on your forehead, not riding back.
Look, the first time you do this it’ll take five minutes. By the tenth time, it’s under sixty seconds.
2. Neck Scarf Shemagh:

The easiest style. No real technique required, just a couple of folds and you’re done. This is the everyday version.
Step 1. Lay the shemagh flat and fold it diagonally exactly like you did for the desert wrap. You now have a large triangle.
Step 2. Hold the triangle with the long folded edge at the top and the single point hanging down. Drape it around the back of your neck so the long edge sits across your upper chest and collarbones. The single point should be hanging down the center of your chest.
Step 3. Take the two ends that are now hanging behind your neck and bring them forward, one over each shoulder.
Step 4. Tie the two ends loosely in front of your chest, just below the collar point. A simple overhand knot works. You don’t need it tight, just enough to keep it from slipping off.
Step 5. Adjust the drape. Pull the front point down a little if you want more chest coverage, or tuck it into your jacket. If you want a cleaner look, let it hang naturally without tucking anything.
That’s genuinely it. Don’t overcomplicate this one. It’s supposed to be casual and effortless, and it looks best when it feels that way too.
3. Full Face Cover Shemagh:

This takes a bit of practice. Don’t get frustrated if the first attempt feels awkward. By the third try you’ll have it dialed in.
Step 1. Start with your triangle fold again, same as the previous two styles. Large square, fold corner to corner, clean triangle.
Step 2. This time you’re not putting the long edge on your forehead. Hold the triangle up and place the long folded edge across the lower half of your face, right across the bridge of your nose. The center point of that long edge should sit between your eyes.
Step 3. Take the two ends and pull them around to the back of your head. Cross them behind your skull and bring them back to the front, wrapping around once.
Step 4. Tie them at the side of your face or tuck them into the wrap at your cheek. The goal is to keep everything flat and tight enough that it doesn’t sag below your nose.
Step 5. Now adjust the front. Pull the fabric up slightly so it sits just under your eyes, not below them. You want full nose and mouth coverage. The single point of the triangle should be hanging down your chest or you can tuck it into a jacket collar.
Step 6. Breathe normally and check that the fabric isn’t pressing directly into your mouth. If it is, pinch the center of the wrap outward slightly to create a small air gap over your lips.
In my experience, this style is best for motorcycling, hiking in dusty conditions, or cold weather where your nose and cheeks take the most punishment.
4. Loose Shoulder Drape Shemagh:
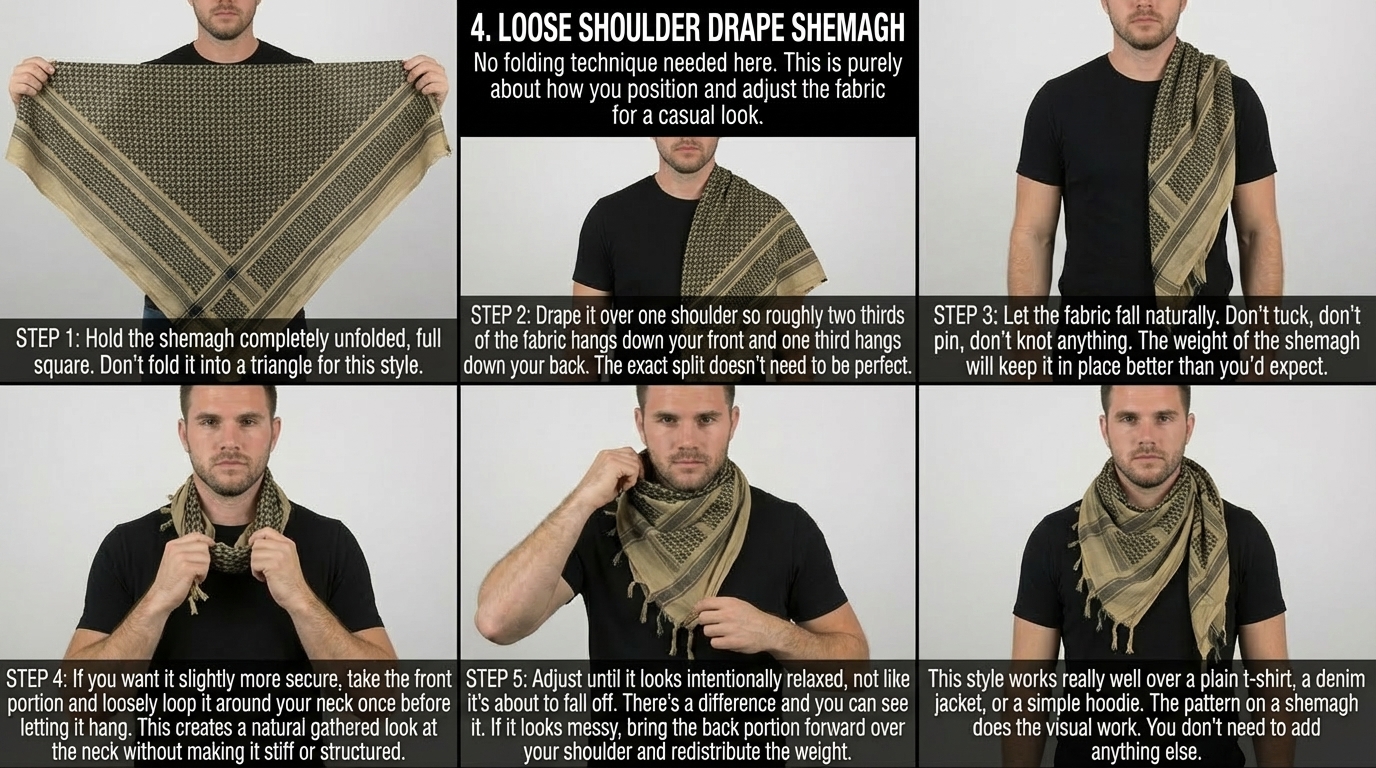
No folding technique needed here. This is purely about how you position and adjust the fabric for a casual look.
Step 1. Hold the shemagh completely unfolded, full square. Don’t fold it into a triangle for this style.
Step 2. Drape it over one shoulder so roughly two thirds of the fabric hangs down your front and one third hangs down your back. The exact split doesn’t need to be perfect.
Step 3. Let the fabric fall naturally. Don’t tuck, don’t pin, don’t knot anything. The weight of the shemagh will keep it in place better than you’d expect.
Step 4. If you want it slightly more secure, take the front portion and loosely loop it around your neck once before letting it hang. This creates a natural gathered look at the neck without making it stiff or structured.
Step 5. Adjust until it looks intentionally relaxed, not like it’s about to fall off. There’s a difference and you can see it. If it looks messy, bring the back portion forward over your shoulder and redistribute the weight.
This style works really well over a plain t-shirt, a denim jacket, or a simple hoodie. The pattern on a shemagh does the visual work. You don’t need to add anything else.
5. Helmet or Hat Liner Wrap Shemagh:

Most people don’t know this version exists. It’s not flashy at all, it’s just genuinely useful.
Step 1. Fold the shemagh into a triangle as usual. Then fold it again by bringing the point up toward the long edge, making a thicker, narrower strip of fabric. You’re essentially quartering the triangle into a long band.
Step 2. Hold the center of that folded strip at the middle of your forehead. The folded strip should be horizontal across your forehead.
Step 3. Pull both ends straight back along the sides of your head, keeping the fabric flat against your skull. Don’t let it bunch up above your ears.
Step 4. Cross the two ends at the back of your head and bring them back forward over the top or around the sides, whichever fits your head size better.
Step 5. Tie the ends at the front of your head, off to one side, or tuck them under the band at the back. The tie should sit low so it doesn’t create a pressure point under a helmet.
Step 6. Put your helmet, hat, or cap directly over the top. The shemagh will absorb sweat, protect your ears from cold wind, and reduce the friction and heat buildup that comes with wearing hard headgear for hours.
One thing I’ll add, make sure the fabric isn’t bunched up under the helmet. Run your fingers around the band before putting the helmet on and smooth out any ridges. Comfort matters a lot when you’re wearing something for four or five hours straight.
Get a cotton shemagh, not polyester. Cotton breathes, it absorbs sweat properly, and it feels completely different against your skin. The polyester ones are cheaper and they show it. A decent cotton shemagh runs about 10 to 20 dollars and it’ll last years if you take basic care of it.